Advanced Usage Guides
Developers can quickly add custom features under the RFUniverse framework according to this document.
This document is intended for developers with some understanding of Unity C# development and Python development.
Importing RFUniverse SDK
Download RFUniverse Core SDK
Drag and drop the RFUniverse_Core_SDK_vx.x.x.unitypackage into your Unity project and import the package
Restart your Unity project, click on the menu
RFUniverse/Check Plugins (Fix Error), and wait for the console outputCheck Plugins (Fix Error) DoneRestart your Unity project again, click on the menu
RFUniverse/Fix Addressable
Installing pyrfuniverse
:warning: Replace [x.x.x] in the commands below with the first three digits of the version number of the RFUniverse Core SDK you imported
conda create -n rfuniverse python=3.10 -y
conda activate rfuniverse
pip install pyrfuniverse==x.x.x
Process of building custom simulation scenes in Unity
Copy an Empty scene and open it
Add objects to the scene and attach the corresponding Attr scripts, manually set different IDs, ensuring there are no duplicates
Refer to pyrfuniverse/Test to write Python scripts, use IDs to read information from Attr objects and call interfaces
Normally publish the scene, after publishing use it the same way as our official Release
RFUniverse Code Execution Structure
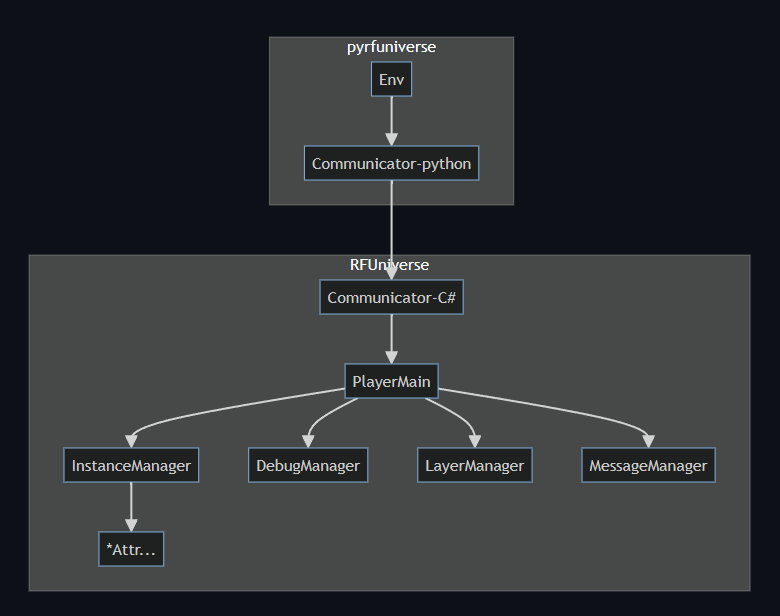
PlayerMain
The main script running the simulation environment, which contains interfaces related to the environment.
Manager
InstanceManager: Centrally manages all Attr objects in the scene, distributes structures, and collects data.
DebugManager: Manages Debug related features and interfaces, does not affect simulation execution.
LayerManager: Manages Unity rendering and physics layers.
MessageManager: Features and interfaces related to dynamic messages.
Attributes
Attr is the basic unit of objects in RFUniverse, all objects are derived from BaseAttr, such as GameObjectAttr, RigidbodyAttr, ControllerAttr, CameraAttr, etc.
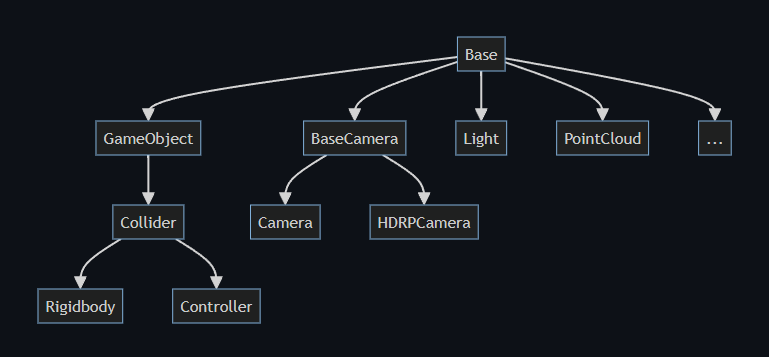
Where:
BaseAttr: Provides basic properties for object loading, creation, deletion, and movement
GameObjectAttr: Extends simple visual effect modifications for objects
ColliderAttr: Extends modification functions for object colliders
RigidbodyAttr: Extends the rigid body properties of objects
ControllerAttr: Extends the operation of robotic arm joints
CameraAttr: Camera image capture function
LightAttr: Lighting control function
PointCloudAttr: Point cloud import and rendering function
Method to import URDF as ControllerAttr:
Import URDF resource files into the Unity project
In the Project window, select the
.urdffile, right-click and chooseImport Robot from Selected URDF fileIn the pop-up window, select the import parameters:
Axis Type: Generally, for URDF composed of .obj model files, select Z Axis, otherwise choose Y Axis
Mesh Decomposer: Unity default collision or VHACD algorithm convex decomposition for colliders
Select the imported Robot in the scene, click on the menu
RFUniverse/Articulation Helper/Normalize RFUniverse ArticulationIn the Inspector’s
ControllerAttrscript, set the ID
Method to import models as rigid bodies (Rigidbody):
Import the model file into the project
Add the model file to the scene
Select the object in the scene, in the Inspector window click AddComponent to add the
RigidbodyAttrscriptIn the Inspector’s
RigidbodyAttrscript, set the ID
Plugins:
Obi: Softbody, Cloth, Fluid, and other physical simulation plugins
BioIK: Joint IK solving plugin
These two plugins are used in the RFUniverse SDK. Without importing these plugins, their functionality is disabled. After importing the plugins, place them in the Plugins directory, then use the menu RFUniverse/Check Plugins (Fix Error) to fix the plugin dependencies and enable plugin functionality.
Other internally verified plugins:
Kinesis - Physical Muscle Model Based Movement: Muscle and skeletal system
Cloth Dynamics: GPU cloth simulation
SteamVR: VR development plugin
Integration and implementation of plugins are according to the normal Unity development logic and have no relation to RFUniverse.
When custom communication is needed, the following dynamic interface is used.
Adding Custom C# Features —— Dynamic Message Interface
The dynamic message interface allows custom two-way communication between Python and C#. When the RFUniverse functionality doesn’t meet the requirements, developers are recommended to use this set of interfaces instead of modifying the SDK source code to avoid conflicts with future SDK upgrades.
In Unity, you can write your own MonoBehaviour C# script using this dynamic interface without inheriting from BaseAttr.
Advanced developers can freely modify RFU and submit Pull Requests for RFU.
Python -> Unity
C#:
RFUniverse.PlayerMain.Instance.AddListenerObject(string head, Action<object[]> action);Start listening by passing in the message name and message reception function. The input parameter type for the reception function is
object[].Python:
env.SendObject(self, head: str, *args)Send by passing in the message name and any number of data.
Unity -> Python
Python:
env.AddListenerObject(self, head: str, fun)Start listening by passing in the message name and message reception function. The input parameter type for the reception function is
list[object].C#:
RFUniverse.PlayerMain.Instance.SendObject(string head, params object[] objects);Send by passing in the message name and any number of data.
For code writing examples of the dynamic message interface, see:
C#: CustomAttr.cs
Python: test_custom_message.py
Supported Data Types
Python |
<==> |
C# |
|---|---|---|
int |
<==> |
int |
float |
<==> |
float |
str |
<==> |
string |
bool |
<==> |
bool |
list |
<==> |
List<> |
dict |
<==> |
Dictionary<,> |
tuple |
<==> |
Tuple |
ndarray |
<==> |
float[] |
Since Python is dynamically typed, the objects sent by C# can be directly used on the Python side.
Objects sent by Python, when received on the C# side, are of type object and need to be converted to the actual type before use. Value types (int, float, string, bool) can be cast directly, while reference types must be converted using specified methods, see CustomAttr.cs for details.
Adding Custom C# Features —— Custom Attr Script
Refer to CustomAttr.cs to write your own custom Attr script.
Create a new script inheriting from any existing Attr, such as BaseAttr:
public class CustomAttr : BaseAttr
{
}
If initialization is required, override the Init method:
public override void Init()
{
    base.Init();
    // Your Init
}
To add or modify permanent data sent to Python, override the AddPermanentData method:
public override void AddPermanentData(Dictionary<string, object> data)
{
      //(Optional) If you need, Add base class data.
      base.AddPermanentData(data);
      //Write data
      data["your data"] = 123456;
}
To add one-time data (effective only in the next frame), call at any location as needed:
CollectData.AddDataNextStep("your datassage", 123456);
To add new interfaces, apply the
[RFUAPI]attribute to the implementation method:
The available input parameter types for the interface are the same as those for the dynamic message interface:
[RFUAPI]
// New implementation function
void Function(string s)
{
      #Do Something
      Debug.Log(s);
}
Right-click on the written Attr script and select
Generate Python Class. This will automatically generate a Python interface script for that class in the same directory. Copy that script to theextenddirectory ofpyrfuniverse. When initializing the Env and passing in that Class, you can achieve the extension of the built-in Attr.
from extend.custom_attr import CustomAttr

env = RFUniverseBaseEnv(ext_attr=[CustomAttr])